Elainz Site Building Toolz |  DEZART Introz | HTMLz | HTML Lesson 2 | HTML Lesson 3 | HTML Lesson 4 | GIFz | Ani GIFz | Ani Barz | Backgroundz | Barz | Buttonz | JAVAz | FLASH ANIz | Slide Showz | Contact Elaine | Helpful Linkz | Realblog  

Lesson Three: Image Source
Image Source is the image or picture, jpg or gif you would like to put on a page. You can learn that you can put an image
picture or gif anywhere in a document page with the proper tag. The source part of the code just tells the computer, “
Where are you getting your picture from?” So that is why we have servers to put all the information on our pages.
On their web site server you will have a file or file manager where you will put all the pictures or gifs. Most sites
will have an upload function for you to bring your pictures from your computer to theirs. This just means you will upload
a copy of that picture saved on their server to place on your web page. This way it will have a path to your picture without
loading up directly from your computer.


You can also put an image to link to like this:
< a href = ” http: // www.angelfire.com/in2/angelz ” >
< img src = ” angels0033.gif ” > < / a >
On the html page tag code. This will make any picture jpg, or gif active when clicked sending it to what web page you want to view.

Page with image linking

The angels0033.gif is set with the width and height of the picture. This will help format the image to the correct proportion
that the original uploaded picture is in. The loading of this picture will have just that space on your web page filled,
loading efficiently. With some of the servers the height and width are already supported by that site and loading the
exact size won’t be a paramount issue. You will just use < img src = ” angels0033.gif ” >
The alt = tag refers you to a box text with information about the link or site. A very good tool! This tool is very useful
in sending the viewer of the web page information about what they are going to click on.
The border = ” 0 ” tells you not to put a border on the image. If you want a border just put like this:
border = ” 3 ” You’ll get a border the color of your link. Here is an example of a jpg with a border.

Page with image border around linking

Click here for info on Reviewing Tags List

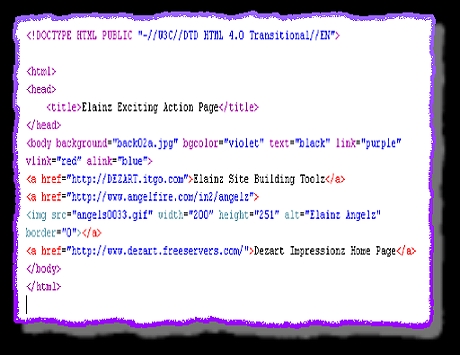
* These codes do not need closing for they are usually closed when closing the body. Body tag needs only to be closed
at the end of the document. From time to time you will find code you don’t have to close. They will be easy to spot.
But for now close the tags you can. Don’t worry! It gets easier. Take just small steps...